
How to Change Your Silverado Remote Battery Without Damaging the Fob
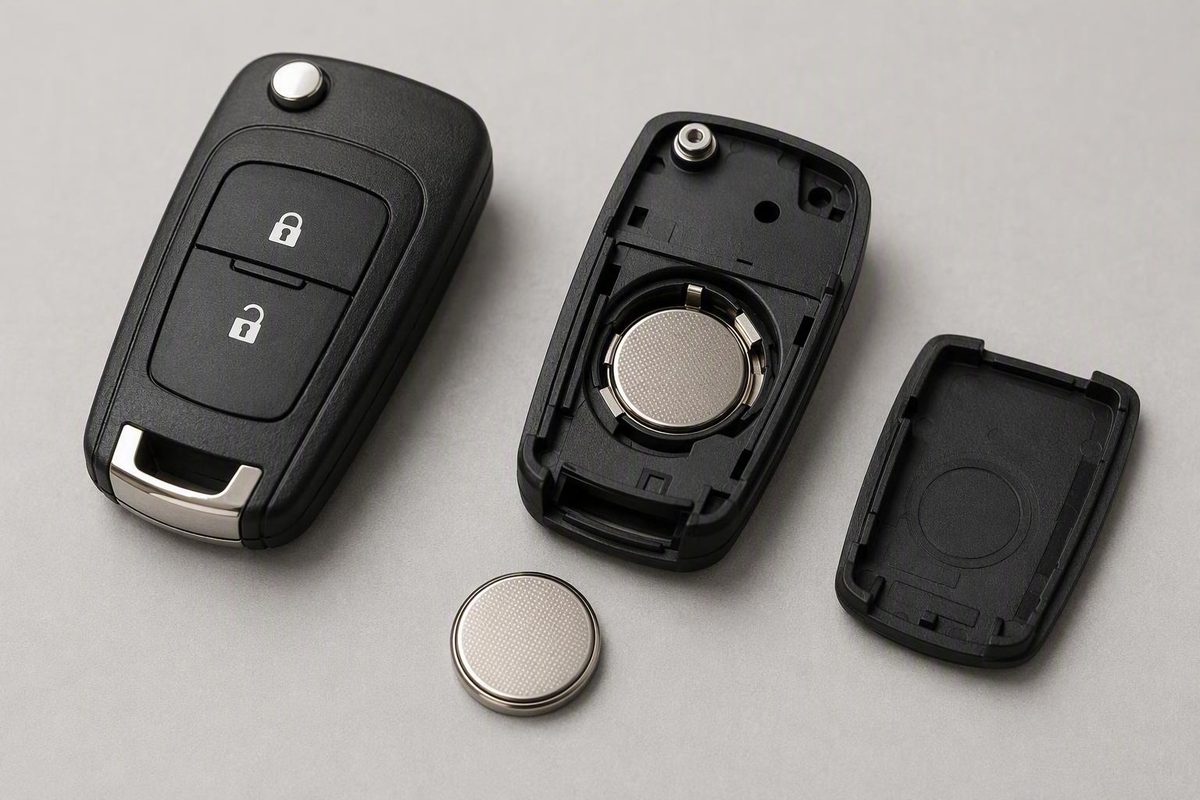
Match the remote, read the old battery and polarity, and use its intended opening point. The conventional non-push-button-start fob uses a CR2032 positive-side up.
A Chevy Silverado key fob battery replacement is usually manageable at home, but only after you identify the remote in your hand. Silverado fobs vary by key style and ignition type, and a factory remote may have been replaced with an aftermarket transmitter or housing.
Use a verification-first approach: read the old battery, record its orientation, open the housing only at its intended notch, and never force a cell or cover that does not fit. The conventional non-push-button-start remote covered in the detailed procedure uses a CR2032 with the positive side facing up. That battery and orientation are not universal across all Silverado fobs.
Quick answer: Check the fob before buying a battery
Do not select a replacement coin cell from the Silverado’s model year alone. The correct battery depends on the actual remote design, and a replacement fob may differ from the one originally supplied with the truck.
Confirm the battery in one of three ways:
- Read the full number printed on the battery you remove.
- Check for a battery specification or polarity symbol inside the housing.
- Consult the owner’s manual applicable to your truck and remote.
A third-party demonstration identifies a CR2032 for the conventional 2014–2023 Silverado remote without push-button start. It places the opening notch near the key ring and installs the battery positive-side up. Those instructions apply to the physical fob in the demonstration, not automatically to every remote used during those model years in PYR Automotive’s conventional-fob tutorial.
A retailer’s battery finder also lists CR2032 for Silverado key fobs in the 2007–2013 and 2014–2021 ranges. The listing does not distinguish every fob design, ignition system, trim, factory part number, or replacement transmitter, and it is not official Chevrolet fitment documentation according to Microbattery’s battery finder.
Do not substitute a coin cell simply because it has the same nominal voltage or appears close in size. A different battery number may indicate different dimensions. The correct cell must sit flat, remain secure under the retainer, meet the contacts properly, and allow the housing to close naturally.
The safest workflow is:
- Identify the remote by its physical design and ignition type.
- Open it carefully, if necessary, to read the installed battery.
- Obtain an exact match to the complete battery number.
- Photograph the original battery and polarity.
- Install the replacement without bending the holder or contacts.
- Close the housing evenly.
- Test every equipped remote function.
If your fob has a removable emergency key, a flip-out blade, a different case shape, or no matching key-ring notch, do not copy the conventional-fob procedure. Follow the design-specific guidance later in this article.
Recognize a weak battery and identify your fob style
A weak key-fob battery may lose performance gradually rather than failing without warning. Possible signs include:
- Reduced operating range
- Intermittent lock, unlock, or remote-start response
- A need to press a button repeatedly
- A dashboard low-key-fob-battery message
- Unreliable fob recognition in a push-button-start vehicle
A dealership guide lists these as common low-battery indicators, but they are not a definitive diagnosis. Similar behavior can result from poor contact, physical damage, water exposure, transmitter failure, or a vehicle-side problem in Steve Austin’s Auto Group’s general Chevrolet-fob guide.
Before opening the case, place your remote into one of three broad categories.
Standard remote
A standard remote is usually a separate plastic transmitter attached to a key ring. The metal ignition key may be a separate piece. Look for a visible seam and a small opening notch at the side or bottom.
Flip-key fob
A flip-key fob stores the metal key blade inside the housing. Pressing a release button swings the blade outward. Battery access may be through a rear cover or a seam in the housing, but the release point varies by design.
Smart fob
A smart fob is associated with keyless access or push-button start and commonly contains a removable emergency key. A release button or slider allows the mechanical key to be withdrawn. The opening slot may be located in the area exposed after key removal.
Ignition type is an important distinction. The detailed CR2032 procedure in this guide applies to a conventional remote for a Silverado without push-button start. If your truck has push-button start and the fob contains a removable emergency key, do not assume the same battery, polarity, or pry point applies.
Match these physical details before following any procedure:
- Complete button layout
- Shape and texture of the back cover
- Emergency-key release, if present
- Key-ring end
- Case seam
- Intended opening notch or slot
- Battery holder and polarity symbol after opening
Two remotes can have similar button arrangements while using different release mechanisms. An aftermarket shell can also look different from the original even when transferred electronics are installed inside it. If the housing described in a tutorial does not closely match your remote, stop and identify the actual design before proceeding.
Tools, workspace, and checks before opening the case
Gather your tools before separating the housing. You will generally need:
- The verified replacement coin cell
- A small flat-blade screwdriver
- The removable emergency key, where applicable
- A clean, dry, well-lit work surface
- A phone or camera
- A small container for the removed battery
Use a screwdriver only if its tip fits the intended opening notch. If the fob’s emergency key is intended to separate the housing, it may fit better than an improvised tool.
Inspect the complete perimeter before prying. Look for a molded notch, an opening slot behind the emergency key, or a deliberate gap in the seam. Do not begin at an arbitrary corner simply because a screwdriver can be inserted there.
The retaining tabs on the conventional remote can break if the cover is lifted aggressively. The demonstrated opening method uses controlled pressure at the key-ring notch, releasing one side and then the other to reduce stress on the tabs as shown in the PYR Automotive tutorial.
Before removing the battery, photograph it in place. Capture:
- The complete printed battery number
- The visible positive or negative marking
- Which face points upward
- How the battery edge fits beneath the retainer
- The position of the nearby contacts
If the printed number is partly hidden, take a second photograph immediately after lifting the battery and before setting it aside.
Hold the replacement by its edges, keep the open remote dry, and avoid touching or bending the circuit board, battery contacts, holder, or retaining tabs. You are replacing the cell, not disassembling the transmitter.
Visual inspection checklist
Before reassembly, confirm the exact battery number, internal polarity symbol, retaining clips, battery contacts, and battery retainer. The replacement must lie flat, remain secure, and match the verified orientation.
Replace the CR2032 in the demonstrated non-push-button-start fob
This procedure applies only to the conventional non-push-button-start housing described above. Stop if your remote has a removable emergency key, a flip-out blade, a different case shape, or no matching notch near the key ring.
1. Confirm that the housing matches
Compare the button layout, back cover, key-ring end, case seam, and opening notch. Do not proceed based only on the truck’s model year.
Read the old battery or internal battery marking. Continue with a CR2032 only if the actual fob confirms that number.
2. Place the remote buttons-down
Set the remote on a clean work surface with the buttons facing down and the back cover facing you. Position the key-ring end where you can see and control it easily.
3. Locate the opening notch
Find the small notch near the key ring. This is the intended opening point for the demonstrated housing. Do not insert the screwdriver randomly along the side seam.
4. Release the first side gently
Insert a small flat-blade screwdriver into the notch and move it toward one side of the slot. Apply only enough lifting pressure to start releasing that side of the cover.
Do not twist aggressively against one plastic clip. Concentrating the force in a single place increases the chance of damaging the retaining tab.
5. Release the other side
Move the screwdriver toward the opposite side of the same notch and lift gently again. Once both sides begin to release, remove the back cover without forcing it past any clip that remains engaged.
6. Photograph and read the battery
Before removal, photograph the installed cell and record its complete number and orientation. The demonstrated remote uses a CR2032, but the physical battery and internal markings in your fob should control.
7. Release the old cell with minimal pressure
Place the screwdriver under an accessible edge of the battery rather than against a contact or the circuit board. Lift only enough to free the cell.
Inspect how the opposite edge engages the retainer if the battery resists.
8. Install the matching CR2032
For this conventional housing, install the CR2032 with the positive side facing up when the internal marking confirms that orientation. Another third-party demonstration shows the same installation and warns that the case tabs can break if handled roughly in Key Fob Rob’s CR2032 example.
Guide the appropriate edge of the cell under the retainer first. Press the opposite edge down until the battery sits securely. Do not force it into place at an angle.
9. Inspect the installation
Confirm that:
- The complete battery number is correct.
- The positive side is up for this specific housing.
- The battery is flat rather than tilted.
- Its edge is secured under the retainer.
- The contacts have not been bent or displaced.
- The battery does not protrude into the cover’s path.
The cover should not be needed to push the battery into position.
10. Reinstall the back cover
Align the cover before pressing it closed. Work around the perimeter so the clips engage evenly.
Inspect the complete seam. Reopen the case and correct the cause instead of squeezing harder.
Both are best avoided with a correctly sized tool and minimal, controlled pressure.
How the process differs for smart and flip-key fobs
The same basic principles apply to other remote styles: use the intended opening point, read the installed battery, preserve its orientation, and avoid forcing the replacement. The case arrangement and entry point may differ.
Smart fob with a removable emergency key
- Find the emergency-key release button or slider.
- Hold the release and withdraw the mechanical key.
- Inspect the exposed area for an opening slot.
- Insert the key or a correctly sized flat tool into that slot.
- Separate the housing with gentle, controlled pressure.
- Photograph the battery before removing it.
- Read the complete battery number.
- Check the internal polarity symbol.
- Install an exact replacement in the verified orientation.
- Align and close the housing.
- Reinsert the emergency key fully.
A dealership guide describes this general smart-fob sequence but also notes that battery type varies with the fob design. Verify the old cell or owner’s manual instead of assigning CR2032, CR2450, or another battery solely from a broad year range before opening a smart fob.
Flip-key fob
Extend the metal key so you can inspect the rear cover and full case seam. Locate the intended notch or release point rather than forcing a tool beneath an unmarked edge.
Open the cover gradually, photograph the battery, and read its complete number. Install an exact replacement according to the internal polarity symbol and recorded orientation. Before closing the cover, make sure the key mechanism moves freely and nothing obstructs the seam.
Older standard remote
A standard remote may have an opening notch at the side or bottom. Insert a correctly sized tool only at that point. Avoid prying around the entire perimeter, which can scar the case and place unnecessary force on its clips.
Keep the button side supported while opening and closing the remote. Do not disturb internal components that do not need to be moved for battery replacement.
For every fob style, the controlling information is:
- The number printed on the removed battery
- Any battery specification inside the housing
- The internal polarity symbol
- The recorded orientation of the original cell
- The applicable owner’s manual
Do not apply a universal positive-side-up rule. That orientation is correct for the conventional CR2032 example, but another housing may arrange its battery differently.
Never force a battery that rocks, sits high, fails to engage the retainer, or prevents normal case closure. Recheck its number and orientation instead.
Reassemble, test, and understand the programming question
Before closing the remote, verify that the battery is flat, secure, correctly oriented, and clear of the housing seam. Make sure no contact is folded away from the cell and no loose piece is trapped between the case halves.
Align the housing carefully. Press around the perimeter in stages until the clips engage. Do not use clips or screws to pull a misaligned case together. If one side will not close, reopen the housing and find the obstruction.
Test the remote close to the truck:
- Press lock and confirm a response.
- Press unlock.
- Test the panic button, if equipped.
- Test remote start, tailgate release, or other equipped functions.
- For a smart fob, confirm normal keyless-entry and start recognition.
- Confirm that the emergency key is fully reinstalled.
Battery replacement and programming are different operations. The Key Fob Rob presenter says no programming is needed after the demonstrated battery replacement 2014-2023 Chevy Silverado Key Fob Remote Battery Replacement - EASY DIY - YouTube. A dealership guide likewise says reprogramming is rarely required after a battery-only change, but neither source establishes a universal rule for every Silverado year, factory remote, or aftermarket transmitter in the dealership’s general explanation.
Keep these concepts separate:
- Battery replacement: Installing a new cell in an existing transmitter.
- Resynchronization: A model-dependent procedure intended to restore communication with an existing remote.
- Transmitter programming: Registering a new or replacement transmitter with the vehicle.
If the remote stops working after battery replacement, do not immediately follow a generic ignition-cycle procedure found online. First check the battery number, polarity, seating, contacts, and case closure. If those checks fail, consult the owner’s manual for the exact truck and remote.
A replacement fob that has never been programmed is also different from an existing fob that worked before its battery weakened.
Troubleshooting a fob that still does not work
Work through these checks in order. Changing several variables at once makes the fault harder to isolate.
1. Confirm the exact battery number
Reopen the housing and compare the replacement with the original battery or your photograph. Read every digit. A cell that fits loosely into the compartment is not necessarily correct.
If the original battery is unavailable, check the internal label and the applicable owner’s manual. Do not let a broad online year chart override the physical fob.
2. Check polarity
Compare the installed orientation with the internal polarity symbol and your original photograph.
Do not assume the positive side must face up merely because that is correct in the conventional example.
3. Verify seating
The battery should lie flat and remain securely beneath its retainer. An edge caught above the retainer may look almost correct while failing to meet a contact.
If necessary, remove the cell, guide the retained edge into place first, and press the opposite edge down with minimal pressure.
4. Inspect accessible contacts
Look for dirt, residue, poor contact, or visible damage. Clean only accessible surfaces carefully, keep liquid away from the electronics, and do not bend the contacts in an attempt to increase pressure.
If a contact is cracked, loose, or visibly deformed, stop. Further manipulation may worsen the damage.
5. Confirm complete case closure
Inspect the entire seam and make sure every clip is engaged. If the case will not close, do not clamp or squeeze it forcibly. Recheck battery fit and component alignment.
Test the feel of each exterior button as well. A button that does not move normally may indicate that the case is not assembled correctly.
6. Try a known-fresh battery
Try another exact-match battery from intact packaging if the first replacement produces no improvement.
Handle the second cell by its edges and install it in the confirmed orientation.
7. Compare a second remote
If another known-working fob is available, test it under the same conditions.
If multiple remotes fail at the same time, a vehicle-side issue becomes more plausible than simultaneous battery failure.
8. Know when to stop
Seek qualified help if you find:
- A cracked housing
- Broken retaining tabs
- A distorted battery holder
- Damaged or missing contacts
- Evidence of water exposure
- Continued intermittent operation
- No response after battery, polarity, seating, contact, and closure checks
Checking polarity and accessible contacts is a supported first response when a new battery does not restore operation, but continuing physical damage or failure may require professional service as outlined in this third-party Silverado troubleshooting guide.
Do not diagnose lost programming by default. Contact a qualified automotive locksmith, Chevrolet dealer, or automotive electrical professional when the basic checks do not resolve the fault. Explain whether another remote works and whether the problem started before or immediately after battery replacement.
Dead-fob access, battery handling, and disposal
A dead smart-fob battery does not necessarily eliminate every access or starting option. Where equipped, the removable emergency key provides a mechanical component for access. The release mechanism and door-lock arrangement can vary, so follow the instructions for the exact truck.
Some Chevrolet vehicles also provide a backup-start procedure in which the fob is placed in a designated in-cabin location. The location and procedure vary by vehicle, so use the Silverado owner’s manual rather than trying a transmitter location described for another model or generation.
The owner’s manual should identify:
- How to remove and use the emergency key
- How to reach the mechanical door lock, if applicable
- The designated in-cabin fob location
- The backup-start procedure
- Relevant dashboard messages
For dead-fob access and battery handling, dealership guidance recommends checking the vehicle-specific procedure, holding the coin cell by its edges, keeping the fob dry, avoiding excessive force, and recycling the removed battery according to local guidance in Steve Austin’s Auto Group’s Chevrolet-fob guide.
Keep new and removed batteries secured and away from children and pets.
After completing the replacement:
- Record the battery number for that specific remote.
- Record the installed polarity.
- Test every button and equipped function.
- Confirm that the housing seam is fully closed.
- Reinstall the emergency key where equipped.
- Note any cracked clips, contact damage, or water exposure.
- Store the battery record by fob description, not merely by truck year.
Frequently asked questions
What battery does a Chevy Silverado key fob use?
It depends on the actual fob. A third-party demonstration covering a conventional 2014–2023 Silverado remote specifies a CR2032, but that does not establish compatibility with every smart, flip-key, factory, or replacement remote in that range as demonstrated by Key Fob Rob.
A third-party battery finder separately lists CR2032 for 2007–2021 Silverado key fobs, but it does not distinguish every possible remote style and is not official Chevrolet documentation in Microbattery’s model listing.
Confirm the complete number on the removed battery, the internal housing specification, or the applicable owner’s manual before buying a replacement.
Which side of a Silverado key-fob battery faces up?
Follow the polarity symbol inside the specific fob and the recorded orientation of the old battery. There is no universal orientation for every Silverado remote.
In the conventional non-push-button-start CR2032 housing covered in the detailed procedure, the positive side faces up. Do not copy that orientation unless your housing matches and its internal marking confirms it.
Do I need to reprogram my Silverado key fob after changing the battery?
Often, no. A battery-only replacement in an existing transmitter commonly leaves its programming intact, but the available evidence does not establish that result for every Silverado year, remote design, or aftermarket transmitter.
Check battery size, polarity, seating, contacts, and case closure first. If the remote still fails, consult the applicable owner’s manual for any model-specific resynchronization procedure. Programming a new transmitter is a separate operation.
Why does my key fob still not work with a new battery?
The replacement may be the wrong size, reversed, incompletely seated, or depleted. The case may not be fully closed, or a battery contact may be dirty, poorly positioned, or damaged. Physical damage, water exposure, transmitter failure, or a vehicle-side issue may also be responsible.
Reopen the housing, compare the installation with your photograph and the internal polarity symbol, and try a known-fresh exact-match cell. If another fob works, concentrate on the nonworking remote. If multiple fobs fail together, seek diagnosis of a possible vehicle-side problem.
Can I start my Silverado when the key-fob battery is dead?
Some Silverados may provide a vehicle-specific backup-start procedure using a designated location for the fob. The location and required steps vary, so consult the owner’s manual for the exact model year and configuration rather than relying on a generic transmitter-pocket location.
Where equipped, the removable emergency key may provide mechanical access. Reinsert it securely after use and replace the coin cell as soon as practical.
Final verification before you finish
Match the procedure to the physical remote, not just the Silverado’s model year. Read the old battery before buying a replacement, follow the internal polarity symbol, and pry only at the intended notch with minimal force.
The conventional non-push-button-start example uses a CR2032 with the positive side facing up, but that example should not be generalized to every Silverado fob. If correct fitment, polarity, seating, contact condition, and case closure do not restore operation, consult the model-specific owner’s manual and seek qualified diagnosis rather than assuming the remote simply needs programming.