
Which Headlight Bulb Fits Your 2008 Chevy Silverado?
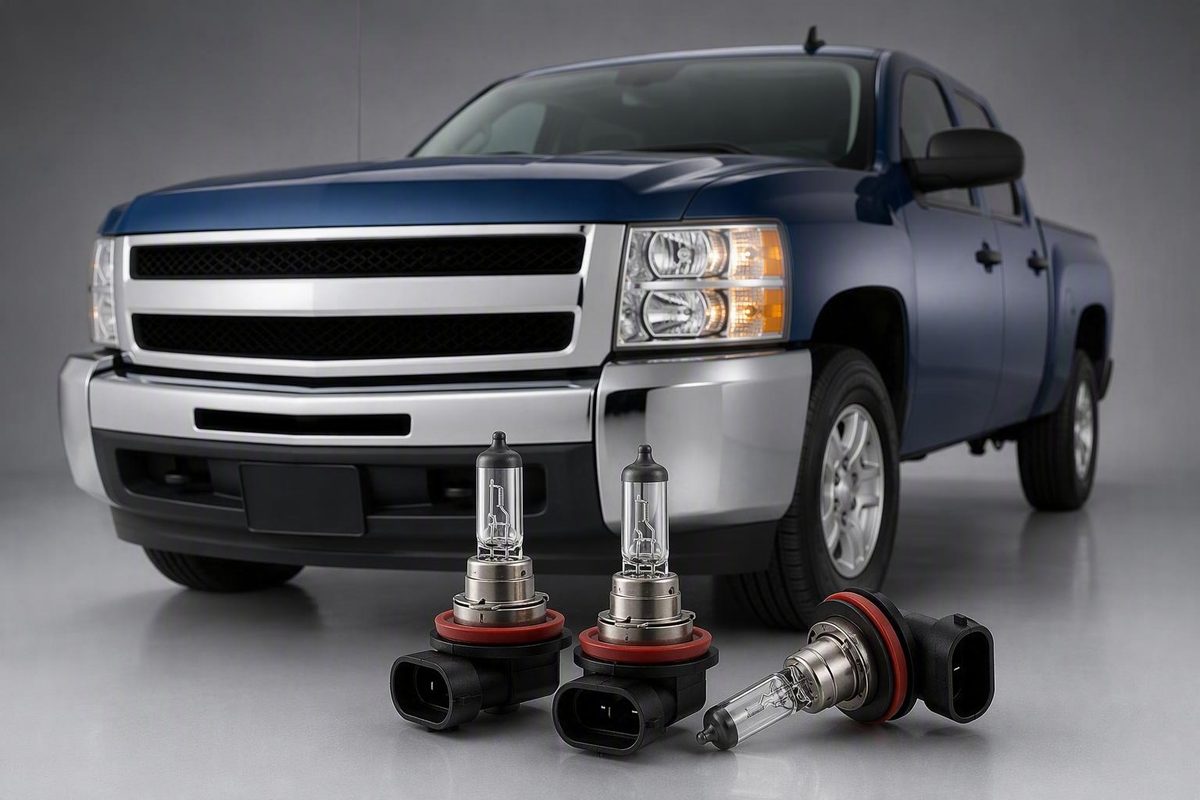
Third-party listings report H11 and 9005 for the 2008 Silverado 1500, but repeated commercial listings do not establish universal factory fitment.
Quick answer: 2008 Silverado headlight bulb sizes
For a 2008 Chevrolet Silverado 1500 with stock-style halogen headlights, the best-supported third-party fitment is:
- Low beam: H11
- High beam: 9005/HB3
HB3 is another designation used for the 9005 bulb family. Fitment is less certain for the HD trucks, so do not buy a bulb based on model year alone.
| Silverado series | Beam position | Best-supported reported bulb | Evidence level |
|---|---|---|---|
| 2008 Silverado 1500 | Low beam | H11 | Best supported in the supplied third-party evidence |
| 2008 Silverado 1500 | High beam | 9005/HB3 | Best supported in the supplied third-party evidence |
| 2008 Silverado 2500HD | Low beam | H11 or H11LL | Tentative; based mainly on seller and owner-forum fitment information |
| 2008 Silverado 2500HD | High beam | 9005/HB3 or 9005LL | Tentative; based mainly on seller and owner-forum fitment information |
| 2008 Silverado 3500HD | Low beam | Unresolved | Insufficient configuration-specific evidence |
| 2008 Silverado 3500HD | High beam | Unresolved | Insufficient configuration-specific evidence |
The confidence descriptions above measure consistency within the available third-party evidence—not official Chevrolet or GM confirmation. A third-party guide identifies H11 low beam and 9005 high beam for 2007–2013 Silverado 1500 models, making that combination the strongest available answer for the 2008 Silverado 1500. See the Silverado 1500 bulb-size guide.
For the 2500HD, an owner discussion about a 2008 truck reports H11LL low beams and 9005LL high beams. That is anecdotal fitment information rather than a factory specification, so the old bulb and connector should control the purchase. Review the 2008 Silverado 2500HD owner discussion.
A separate seller table for 2008–2010 Silverado 2500HD models lists 9005/HB3 for the high beam and groups H8/H9/H11 products under the low-beam position. That grouping supports H11 as a lead but does not prove that conventional H8, H9 and H11 bulbs are interchangeable in the truck. Do not order an H8 or H9 unless the installed bulb, connector and vehicle-specific catalog result confirm it. Review the seller’s 2500HD fitment table.
Do not extend either result automatically to a 2008 Silverado 3500HD. The available evidence does not establish its low- or high-beam bulb by headlamp configuration. Inspect the installed bulb and use a VIN-based catalog before ordering.
Keep headlight and fog-light positions separate. One seller reports a 5202 fog-light bulb for certain 2007–2015 Silverado 1500 applications, but that does not establish universal fog-light fitment for every 2008 Silverado. The seller’s package distinguishes H11 low beam, 9005 high beam and 5202 fog light.
Bottom line: For a verified 2008 Silverado 1500 with stock-style halogen headlamps, start with an H11 low-beam bulb or 9005/HB3 high-beam bulb. For a 2500HD, those same families are plausible but require inspection. Treat 3500HD fitment as unresolved until confirmed on the individual truck.
Verify fitment before ordering a bulb
A product advertised for a “2008 Chevy Silverado” is not necessarily listed for every truck carrying that name. The Silverado 1500, 2500HD and 3500HD are separate applications, and broad online listings may not distinguish them carefully. Replacement housings, previous-owner conversions and other configuration differences add further uncertainty.
Use the following sequence before placing an order.
1. Identify the Silverado series
Confirm whether the truck is a:
- Silverado 1500
- Silverado 2500HD
- Silverado 3500HD
Use the exterior badging, registration, VIN result or parts-catalog description. Do not assume a product advertised for the 1500 also fits an HD truck.
2. Identify the failed lighting position
Determine whether you are replacing the:
- Low beam
- High beam
- Fog light
Operate the lights briefly and observe which position fails. If needed, compare the working side with the nonworking side. Low- and high-beam bulbs may share the same headlamp assembly, but they have different intended positions and may use different bases and connectors.
3. Inspect the installed headlamp system
Determine whether the truck appears to retain its stock-style halogen arrangement or has been modified. Possible signs of a conversion include:
- External drivers or ballasts
- Added anti-flicker modules
- Nonfactory wiring or splices
- Modified rear covers or dust caps
- Aftermarket headlamp housings
- Fans or heat sinks attached to the bulb
Do not identify the system by light color alone. An aftermarket light source can use a base originally intended for a halogen bulb, while some halogen bulbs use coatings that alter their appearance.
4. Read the number on the removed bulb
The installed bulb is one of the most useful fitment checks. Remove it and look for a clear marking such as:
- H11
- H11LL
- 9005
- HB3
- 9005LL
- Another printed bulb number
If dirt obscures the marking, clean the base gently. Photograph the number before discarding the bulb so you retain a reference for ordering or returns.
5. Compare the base and connector
Place the old and replacement bulbs side by side before installation. Compare:
- Locking-tab shape
- Tab spacing and orientation
- Base diameter
- Connector profile
- Terminal number and position
- Seal or O-ring location
- Clearance behind the installed bulb
A seller’s compatibility statement does not override an obvious physical mismatch. Do not trim a locking tab, force a connector or defeat the bulb’s retaining system to make a questionable part fit.
6. Run a VIN-based parts lookup
Enter the VIN into a reliable parts catalog or retailer fitment tool. Complete every requested field, including the series, trim, engine or lighting configuration where applicable. Treat a broad search-results page as a starting point rather than a final answer.
Multiple third-party listings consistently report H11 and 9005 for the 2008 Silverado 1500, but repeated commercial listings do not establish universal factory fitment. The strongest practical verification combines:
- A series- and VIN-specific catalog result
- The number printed on the removed bulb
- A physical match at the base and connector
One 2008 Silverado demonstration correctly identifies the low beam as H11 but uncertainly suggests “9003” for the high beam. That isolated comment conflicts with the more consistent 9005/HB3 evidence and should not be used to order a bulb. The demonstration remains useful for showing rear access and connector inspection, not for its uncertain high-beam number.
Before buying, complete this checklist:
- [ ] Silverado series confirmed: 1500, 2500HD or 3500HD
- [ ] Trim and relevant vehicle details recorded
- [ ] Failed position confirmed: low beam, high beam or fog light
- [ ] Headlamp type and any conversion equipment inspected
- [ ] Old bulb marking read and photographed
- [ ] Replacement base compared with the old bulb
- [ ] Connector shape and terminals compared
- [ ] VIN checked in a dependable parts catalog
- [ ] Seller’s return policy reviewed
- [ ] Previous lighting modifications identified
If these checks disagree, pause before ordering. The installed headlamp may differ from the catalog assumption, or the listing may cover more configurations than its fitment data can support.
Choose between a standard halogen replacement and an LED retrofit
If the truck has a halogen housing and the goal is a straightforward repair, a verified like-for-like halogen bulb is usually the simpler path. It preserves the original type of base, connector and light source rather than introducing several compatibility variables at once.
That still does not make every H11 or 9005 product correct for the truck. The bulb must match the required beam position and installed socket. A verified H11 halogen should replace an H11 halogen, and a verified 9005 halogen should replace a 9005 halogen.
Retailers also offer LED products using H11 and 9005-style bases. A matching base establishes only part of the required compatibility. It does not prove that the LED will provide:
- Suitable light distribution in the housing
- Correct emitter placement
- Adequate space for a fan or heat sink
- Clearance under the rear cap
- Compatible electrical behavior
- A secure mounting position
- Proper environmental sealing
- Acceptable glare control
- Compliance with applicable local rules
Before choosing an LED retrofit, ask:
- Was the housing designed or approved for that light source?
- Does the bulb fit without modifying its locking tabs?
- Is there enough room behind the housing?
- Can the original dust cap be installed correctly?
- Does the electrical connector lock without an adapter or alteration?
- Does the emitter sit in the intended optical position?
- Can the bulb be clocked correctly and remain secure?
- Does the resulting pattern remain controlled?
- Can the headlamp be aimed correctly?
- Is the retrofit permitted where the truck is operated?
Some LED installations may flicker or require an anti-flicker or CAN-bus component. A seller specifically warns that some sensitive applications may need an additional decoder, but that does not make such a component universally necessary or guarantee that it will correct every malfunction. Review the seller’s LED compatibility warning.
Useful road illumination depends on the entire headlamp system. The reflector or projector, bulb position, cutoff, housing aim and lens condition determine where the light travels.
A whiter appearance does not prove better visibility, and a larger advertised output does not establish how much controlled light reaches the road. Seller statements about brightness, service life, water resistance, beam quality or universal plug-and-play installation should be treated as marketing claims unless supported by independent testing.
A Silverado 2500HD owner discussion illustrates the uncertainty around LED and HID conversions. Participants report conflicting experiences and emphasize that housing optics, bulb position and lens condition influence the result. These comments are anecdotal rather than controlled photometric testing, but they identify the variables that should be evaluated. Read the Silverado 2500HD lighting and optics discussion.
The available evidence does not support naming a “best” LED bulb. If your priority is a routine repair, use a verified like-for-like halogen replacement. If you choose an LED or HID conversion, treat it as a change to the complete optical and electrical system—not merely a bulb swap—and check the rules that apply where the truck is driven.
Tools, preparation, and bulb-handling precautions
Park on a stable, level surface with enough light and room to work. Set the parking brake, switch the exterior lights off, prevent them from being turned on accidentally and open the hood. If the headlights were operating recently, allow them to cool before reaching behind the housing.
For a basic rear-access replacement, useful items include:
- Clean nitrile or mechanic’s gloves
- Flashlight or work light
- 10 mm socket and ratchet
- Flat-blade screwdriver
- Clean cloth
- Small mirror
- Container for removed fasteners
- Verified replacement bulb
The hand tools may only be needed to shift an under-hood obstruction. Move as little as necessary and keep every screw, clip and fastener organized.
For the more involved grille-and-headlamp-removal route, the demonstrated tool list is:
- Flat-blade screwdriver
- 10 mm socket
- Ratchet
- Needle-nose pliers
Before unwrapping or installing the replacement, compare it with the old bulb. Check the number, base, tabs, connector and seal. If the new bulb does not align naturally, stop instead of forcing it.
Wear clean gloves when handling a halogen bulb and avoid touching its glass with bare fingers. Transferred oil may create a hotter area and shorten bulb life. If the glass is touched, follow the bulb manufacturer’s cleaning instructions before installation. A repair guide for a 2008 Silverado 2500HD gives the same no-touch precaution and conditionally warns that an HID or xenon ballast may remain energized. Review the bulb-handling and HID precautions.
That HID warning applies only if an HID or xenon system is actually installed. The available evidence does not establish factory HID equipment for every—or any specific—2008 Silverado configuration. If you find a ballast, igniter or unfamiliar conversion wiring, use system-specific service information. Have the system inspected professionally if you cannot identify it safely.
Release the locking tabs as designed and support the bulb while separating the connector.
How to replace the bulb from behind the headlight housing
Assess access from behind the headlamp first. Several demonstrations and owner reports describe replacing the bulb without removing the grille or complete headlamp, but working room can vary by side, engine-bay arrangement and previous modification.
Use this general sequence:
- Identify the failed beam. Turn the lights on briefly, determine whether the low or high beam has failed, and switch the lights off again.
- Locate the correct bulb behind the housing. Use the working side as a reference if the rear layout is difficult to see.
- Create only the clearance required. Shift a nearby component if necessary, retaining all fasteners.
- Grip the bulb by its base. Do not pull on the wiring.
- Rotate the bulb counterclockwise. Turn it only far enough to release the locking tabs.
- Withdraw the bulb carefully. Keep it controlled as it clears the housing.
- Release the connector tabs. Pull the connector from the bulb base, not by its wires.
- Inspect the connector. Look for corrosion, discoloration, loose terminals or damaged plastic.
- Compare the old and new bulbs. Confirm the marking, tabs, connector and seal.
- Attach the replacement. Push the connector onto the bulb until its lock engages.
- Insert the bulb. Align the tabs with the housing openings.
- Rotate it clockwise to lock. Confirm that the base sits evenly and cannot move loosely.
- Test both beam settings. Check the repaired position and the other beam.
- Restore anything moved for access. Reinstall fasteners and confirm that adjacent components are secure.
The high- and low-beam positions use different bulb families, but the basic unlock, disconnect, reconnect and lock process is similar. A Silverado replacement demonstration identifies H11 as the low beam, 9005 as the high beam and covers the procedure for either position. Watch the high- and low-beam replacement demonstration.
Driver-side access
Owner reports describe limited working room near the washer-fluid area. If that obstruction prevents a comfortable grip, a 10 mm tool may allow it to be loosened or shifted enough to provide access. Avoid stressing attached hoses and reinstall the fastener after testing the bulb.
Passenger-side access
On the passenger side, owners describe loosening the intake tube with a flat-blade screwdriver and lifting or shifting the air box when more room is required. Note the original positions of the clamps, ducts and locating tabs so the intake can be restored correctly. These methods come from anecdotal owner reports rather than a configuration-specific GM service procedure. Read the reported driver- and passenger-side access methods.
Low-beam access may be confined, and a first attempt can take longer than an experienced owner’s estimate. Do not make speed the goal. Correct bulb seating, an intact connector and proper reinstallation of moved components matter more.
If the bulb will not rotate, confirm that you are gripping the base and turning it counterclockwise. If it rotates but will not withdraw, check whether every tab has cleared the housing. If the replacement will not lock clockwise, remove it and compare its tabs with the old bulb. Do not force a mismatched or misaligned base.
When access requires grille and headlamp removal
Rear access is the first method to assess, but it may not provide enough room on every truck. Another documented procedure removes the grille and complete headlamp assembly. This can provide clearer access when the engine-bay arrangement differs, the housing itself needs attention or the bulb cannot be reached comfortably from behind.
Treat this as a secondary access method, not a mandatory procedure for every bulb replacement.
The documented grille-removal sequence is:
- Pry out the eight plastic clips retaining the upper trim panel.
- Remove the four 10 mm grille bolts.
- Release the four grille clips, using needle-nose pliers if needed.
- Pull the grille forward without bending or twisting it.
The demonstrated headlamp-removal sequence is:
- Remove the two accessible 10 mm headlamp bolts.
- Pull the wheel-well panel back enough to reach the hidden mounting point.
- Remove the additional 10 mm fastener behind the panel.
- Pull the headlamp assembly forward.
- Disconnect the wiring harness by its connector.
- Turn the bulb base counterclockwise and remove it.
- Install the replacement and rotate it clockwise to lock.
- Reconnect the harness and test the lamp before completing reassembly.
Those fastener counts and sizes come from a demonstration performed on a 2011 Silverado 1500 whose associated-vehicle list includes the 2008–2013 Silverado 1500. Its broader applicability statements are inconsistent, so do not assume an identical arrangement on a 2500HD or 3500HD. Follow the documented grille and headlamp procedure.
Arrange removed clips and bolts in order. Support the headlamp as its final fastener is removed so the assembly does not hang from the wiring.
Stop if your truck does not match the documented layout. Different fasteners, aftermarket housings, unfamiliar wiring or resistance from an unseen attachment are reasons to consult service information for the exact configuration. Do not guess at fastener torque; use a specification applicable to the truck and component if one is required.
Post-installation checks for beam operation and aim
Test the bulb before reinstalling every access component, cover, trim panel or grille fastener. That makes a loose connector or improperly seated bulb easier to correct.
Confirm that:
- The connector is fully seated and locked.
- The bulb is rotated completely into position.
- The seal sits evenly against the housing.
- No wiring is pinched, stretched or rubbing a sharp edge.
- Both low beams operate.
- Both high beams operate.
- The replacement does not flicker.
- Any moved intake or reservoir components are secure.
- Dust caps or rear covers are correctly reinstalled.
Next, park on level ground facing a flat wall or garage door. Compare the left and right patterns. This visual check is useful for finding an obvious problem, but it is not a substitute for the correct aiming procedure.
Investigate a pattern that appears:
- Dramatically higher or lower than the opposite side
- Scattered above the normal beam area
- Rotated or oddly shaped
- Uneven despite matching bulbs
- Bright immediately in front of the truck but weak farther ahead
- Unstable or flickering
If the pattern changes substantially after installation, remove the bulb and check the tab alignment before adjusting the housing.
For an LED retrofit, verify that the emitter orientation follows the bulb manufacturer’s instructions and that the mounting collar remains secure. Correct alignment is especially important after changing light-source technology or disturbing the headlamp mounting points because misdirected light may create glare for other drivers.
Inspect the exterior lens with the lights on. A cloudy, yellowed, frosted or damaged lens can reduce useful illumination and scatter light even when the bulb operates. Correcting a housing or lens problem may be more useful than installing another bulb with a larger advertised output.
Replacing both bulbs together is sometimes recommended to obtain a more similar color and apparent intensity. It is not mandatory merely because one bulb failed. If you replace one, compare both sides afterward and decide whether the remaining bulb’s condition justifies replacing it.
Troubleshoot a headlight that still does not work
If the replacement bulb remains dark, start with the work just performed rather than assuming a major wiring failure.
1. Confirm the bulb and position
Verify that the replacement has the correct number and is installed in the intended low- or high-beam socket. Compare it with the removed bulb and the working side. Do not treat H11 and 9005 as interchangeable merely because both appear in Silverado search results.
2. Confirm the bulb is locked
Remove and reinstall it if the tabs or seal do not sit evenly.
3. Reseat and inspect the connector
Switch the lights off, release the connector and inspect it for:
- Corrosion
- Darkened terminals
- Melted or distorted plastic
- Loose terminal fit
- Broken locking tabs
- Frayed or exposed wiring
- Moisture or debris
Do not conceal a visibly damaged or melted connector by installing another bulb. Damage of that kind warrants proper diagnosis.
4. Test a known-good bulb where appropriate
If the same bulb type is used on the opposite side and it can be exchanged safely, a known-good bulb may help distinguish a bulb problem from a circuit problem. Do not swap unlike high- and low-beam bulbs or force a bulb into the wrong socket.
5. Check the correctly labeled fuse
Use the owner’s manual, fuse-box legend or reliable service information to identify the fuse for the affected side and beam. A third-party 2008 Silverado demonstration discusses separate circuits for different sides and beams and recommends checking the connector for corrosion, but its transcript does not provide a labeled fuse-box diagram. Use it only as a troubleshooting overview, not as a substitute for the truck’s fuse legend. View the bulb and fuse troubleshooting demonstration.
6. Inspect accessible wiring and grounds
Examine visible wiring for abrasion, pinching, loose connections, previous splices or conversion equipment. Do not probe unfamiliar circuits or energized HID components without the applicable procedure and equipment.
7. Diagnose weak light differently from no light
If the lamp works but road illumination remains poor, check:
- Lens haze or frosting
- Moisture inside the housing
- Reflector or projector condition
- Bulb seating
- Headlamp aim
- Beam pattern
- Connector condition
- Mismatched bulbs
- Retrofit optical compatibility
A higher-output product will not correct a cloudy lens, damaged reflector, improperly seated bulb or badly aimed housing.
8. Consider the ballast only if an HID system is installed
In an actual HID system, either the bulb or ballast may contribute to a failure. Because the system may include energized high-voltage components, use its specific isolation and diagnostic procedure rather than ordinary halogen-bulb assumptions.
Seek professional diagnosis if you find melted wiring, repeated fuse failure, a burning smell, unresolved flicker, a damaged socket, evidence of a short circuit or an HID system you cannot identify safely.
Frequently asked questions
What is the low-beam bulb for a 2008 Chevy Silverado 1500?
The best-supported third-party fitment for a 2008 Silverado 1500 with stock-style halogen headlights is an H11 low-beam bulb. Confirm the number on the removed bulb and check the VIN before ordering. The 2007–2013 Silverado 1500 guide identifies H11 for the low beam.
What is the high-beam bulb for a 2008 Silverado?
For the 2008 Silverado 1500, the best-supported answer is 9005/HB3. Available 2500HD evidence points to the same family, but individual verification remains necessary. The supplied evidence does not resolve 3500HD fitment. The Silverado replacement overview identifies 9005 as the high beam.
Do the 2008 Silverado 1500 and 2500HD use the same headlight bulbs?
Available third-party evidence points to the same broad families: H11 or H11LL for the low beam and 9005/HB3 or 9005LL for the high beam. Confidence is stronger for the 1500. A 2500HD seller table supports H11 and 9005/HB3 as leads, but the installed bulb and VIN result should decide the purchase. Check the 2500HD seller fitment table.
Do I have to remove the grille or headlight assembly to change the bulb?
Not necessarily. Rear access is the first method to assess, and some owners report gaining room by shifting the washer-fluid or intake-area obstruction. If clearance is inadequate or the housing differs from the demonstrated layout, grille and headlamp removal is a documented secondary method.
Can I replace the H11 and 9005 halogen bulbs with LEDs?
LED products are sold with H11 and 9005-style bases, but a matching base does not prove full compatibility. Check the housing, rear clearance, dust-cap fit, connector, electrical behavior, emitter position, beam pattern, aim and applicable local rules.
For the least complicated repair, use a verified like-for-like halogen bulb. Judge any LED conversion by controlled road illumination and glare—not color or advertised output alone.
For a 2008 Silverado 1500, H11 low beam and 9005/HB3 high beam remain the best-supported choices. Available 2500HD evidence points in the same direction but requires confirmation, while 3500HD fitment should be verified independently. Inspect the installed bulb and run the VIN before ordering, assess rear access first, handle halogen glass with clean gloves, and evaluate any LED retrofit as a complete optical and electrical compatibility question.
This article provides general information. Vehicle-specific service information should control where configurations differ. Chevy Truck Expert is an independent enthusiast publication and is not affiliated with or endorsed by General Motors. Read the publication terms.